If at anytime you do not understand anything about the CSS Code Assembler DO NOT hesitate to ask. You can email me at jwacintro@bis.midco.net anytime.
There are many ways to place and utilize css styles on your website or project. With many different outcomes depending on the end users browser version. The examples and other items contained in the CSS Code Assembler have been tested using IE6, NS4, NS6, Mozilla1 and Opera6. I have tried to list the compatibility's for these browsers and other versions where I have found sufficient documentation to support the statements.
CSS Code Assembler was not originally designed to teach CSS but it so happens learning CSS becomes very easy while using the Assembler. CSS Code Assembler was designed to ease the repetition and extensive code input while making styles.
It is best if you know at least a little about what CSS style tags need to look like in order for them to work properly as well as some html to correctly place them in your web page source code.
I have put together a few initial items that are required for completing this task without having to go out and learn everything first. We want you to be able to start creating right away and the best way to do that is to give you a little head start. We do suggest you visit the sites in the resource dropdown box and use our tools and our help pages to learn more and to be able to understand just how easy and convenient css can really be.
You will find some of the pre-made items for html in the dropdown box marked HTML Elements but we suggest you start here Quick Start first so that you will understand just what is needed to make everything work correctly when you upload your site and place it out there for all to see.
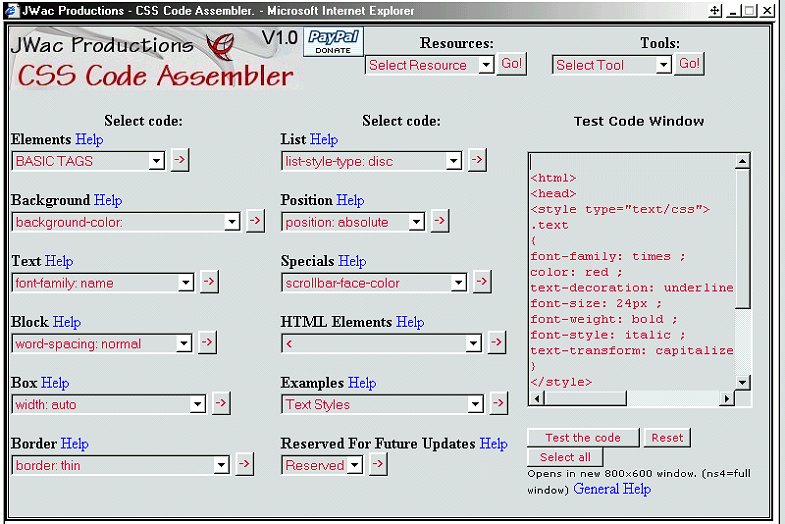
Elements: These are the basic tags needed to create css styles.
Background: These are used for creating different background effects.
Text: These are used for creating different text effects.
Block: These are used for positioning items in a box, table or other areas.
Box: These are for creating box's (Similar to tables)
Border: These are used for creating different border effects.
List: These are used for creating lists and their effects.
Position: These are used for creating elements similar to layers.
Specials: These are used for creating special effects.
HTML Elements: These are some of the basic tags needed when using the test code window with html code.
Examples: Different examples of how to make css styles.
Reserved For Future Updates: This may be used at a later time. Be sure to register to receive updates.
Test Code Window: This is where you will create and test your code.
Test code button: Click this to open a new window with the results of your newly created code.
Reset button: This will clear the test code window. (Caution any code created will be lost)
Select all button: Click this to select all of the code in the test code window.
Resources: These resources may help you in learning and creating the code you desire.
Tools: These tools will help you to create the code and style you desire.
Help links: Click these for help.
Using the assembler is simple. You need to build the code from scratch starting with the Elements dropdown box.
Lets go through making a style that changes the background color of entire page(body).
Like this:
<style type="text/css">
body
{
background-color: red
}
</style>
If the background color did not change make sure your code looks like the one above. If it is right then you may have to add the html element tags to make it work.(Depending on your browser) like this:
<html>
<head>
<style type="text/css">
body
{
background-color: red
}
</style>
</head>
<body>
</body>
</html>
The html elements are located in the HTML Elements dropdown box. You would start in the order as above when creating your css code.
Now if you are creating a css style that uses more than one design element such as background-color and font-size you would select the ; from the Elements dropdown box and place it in the test code window before adding the next style like this:
<style type="text/css">
body
{
background-color: red ;
font-size 18px
}
</style>
Do not place the ; after the last design element.
When adding items to the test code window everything will be placed in the proper place either on a new line or behind the required element.(Same line). CSS code can be created on just one line but it is easier to read if it is placed on separate lines. With the Assembler just about everything goes on a separate line for the ease of reading and creating the code.
If you make a mistake and miss a step when creating your code you can either select the code you want and use the arrow button to place it in the test window (will always go to the bottom) and then cut and paste it in the right place or you can manually type in the code where it belongs. You could always use the reset button which will clear all the code and start over again.
The select all button will select all the code for you so that you can just copy and paste it into your html document.(This button may not work in some browsers.)
It is really very simple to create your code with the assembler and as you create you will learn and soon you will be making great web designs that suit your needs as well as learn just how much better using css really is.
When adding css directly to your page this is what it should look like. Placing it between the head tags. Then placing the class="name" in the required place. The class="name" may be added to many different areas in your web page each effecting the design in a different way. Copy and Paste this into the test box and see what it looks like. Change some of the elements and see what you can do with it.
<html>
<head>
<title>Untitled Document</title>
<meta http-equiv="Content-Type" content="text/html; charset=iso-8859-1">
<style type="text/css">
.name { font-family: Arial; font-size: 24px; color: #CCCC66}
</style>
</head>
<body bgcolor="#FFFFFF" text="#000000" class="name">
This is some text and all the Text on the page will be the same size and color.
</body>
</html>
--------------------------------------------------------------------------------------------------------------------
You can also use external style sheets this way. The href points to the css file somewhere else in your directory. This allows you to add this style to many pages and if you want to change the color or other element you only have to change one file and all pages will be updated.
<html>
<head>
<title>Untitled Document</title>
<meta http-equiv="Content-Type" content="text/html; charset=iso-8859-1">
<link rel="stylesheet" href="name.css" type="text/css">
</head>
<body bgcolor="#FFFFFF" text="#000000" class="name">
This is some text and all the Text on the page will be the same size and color.
</body>
</html>
------------------------------------------------------------------------------------
This is what the external file class="name" looks like and is saved as name.css
.name { font-family: Arial; font-size: 24px; color: #CC9933}
It's identical to the one embedded in the page without the style tags. <style type="text/css"></style>
-----------------------------------------------------------------------------------------------------------
Some styles do not use the .name feature to produce their effect. Such as adding styles that effect the body of a document. This only requires the word body to come before the style elements. There are other items that are used this way also. The best way to know when to use a name without the period is this: If it effects the html directly such as body, input textarea or other then don't use the period. If you try adding a style this way and it does not create the effect then add the period and make the reference to the style in your code and test it again. Sometimes a little trial and error is needed to get it just right.
------------------------------------------------------------------------------------------------------------
Those are 3 ways to add style sheets to your page but there are many other tips
and tricks to making your site just the way you want. So check out the resources
and some of the examples in the dropdown box as well as just start playing with
the CSS Code Assembler. (You will master it quickly)
------------------------------------------------------------------------------------------------------------
One thing to remember when testing code in the test code window: Depending on your browser you may need to add the html, head and body tags for the style to show in the test window. See the examples to see what this should look like. Best thing to do is to make a simple css style such as changing the body background color and try testing it without adding the html, head and body tags. If it works great if not then you will need to add these tags before testing.